Introduction to Blynk IOT
Blynk is a low-code IoT software platform for businesses and developers. It allows users to create mobile and web applications for their IoT devices without any coding required. It supports over 400 hardware modules, such as ESP32, Arduino, Raspberry Pi, and more. Users can connect their devices to the secure Blynk cloud, and control them remotely with drag-and-drop app builders.
It also provides features such as data visualization, firmware updates, user management, alerts, and automations. Blynk is trusted by over 500,000 engineers worldwide, and powers manufacturers of smart home products, HVAC systems, agricultural equipment, and other IoT solutions.
To get started with Blynk, users need a smartphone, an IoT hardware, an internet connection, and an account. It offers a quickstart guide, a library of firmware and APIs, and a community of IoT developers to help users build their own IoT products.
Getting Started with Blynk
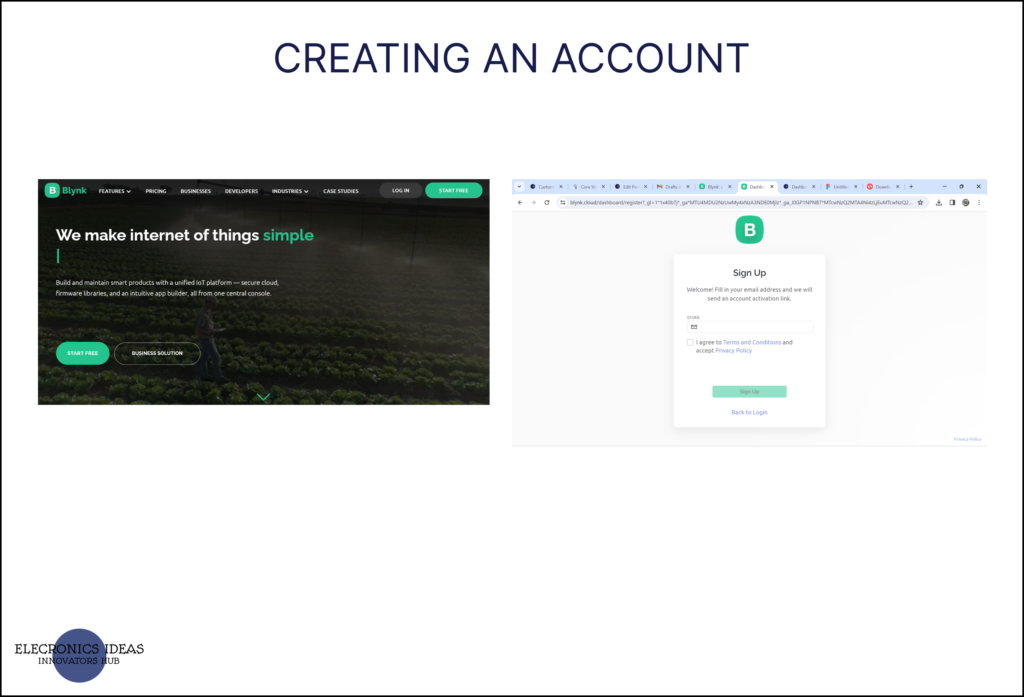
To create an account with Blynk, you need a valid email address and a smartphone with the app installed. Here are the steps to follow:
- Open the app for iOS or Android, or go to web Console.
- Tap Sign Up button if you don’t have an account.
- Enter your email, read and agree to the Terms and Conditions.
- Tap Continue and check your inbox for an email with instructions.
- Tap Create Password button in the email and enter your password.
- Fill in your profile information and tap Finish.
Understanding Blynk IOT
There are many aspects of blynk that needs to be understood for you to use it effectively in your projects. Below are the basic things:
Template
Creating a template in Blynk is a way to define the common features and settings of a group of devices that perform a similar function. For example, you can create a template for smart home switches, and then add multiple devices that use that template. A template consists of the following components:
- Basic info: the name, hardware, and connectivity of the template.
- Datastreams: the data channels that allow the devices to communicate with blynk cloud and app.
- Metadata: the additional information about the devices, such as location, firmware version, etc.
- Events: the triggers and actions that can be configured for the devices, such as sending notifications, changing device status, etc.
- Web dashboard: the web interface that allows you to monitor and control the devices from a browser.
- Mobile app dashboard: the mobile interface that allows you to customize the app widgets for the devices.
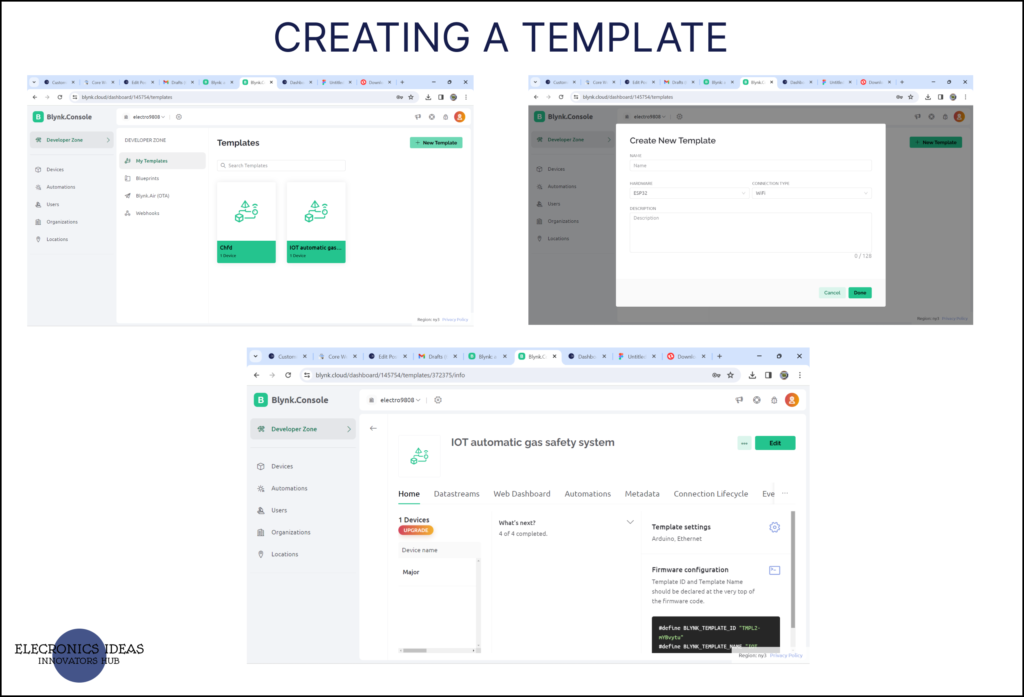
To create a template, you need to enable the developer mode in the web Console or mobile App, and then follow these steps:
- Click on the New Template button in the Templates section of the Developer Zone.
- Provide the basic info for the template in the modal window that opens, and click Done.
- Go through the tabs Info, Datastreams, Metadata, Events, and Web Dashboard to set up the components of the template.
- Click Save once you have finished the setup. You can also edit, duplicate, or delete an existing template using the dropdown menu in the template view. However, deleting a template will also delete all the devices that use it, so be careful with this action.
Devices
Creating a new device is a process of adding a physical hardware module to your project and assigning it a device template, a datastream, and an AuthToken. A device is a representation of your hardware in Blynk, which allows you to monitor and control it from the app or the web dashboard. You can create as many devices as you want, and group them by projects or templates.
There are two ways to create a new device: using the mobile app or using the web console. The mobile app method is easier and more convenient, as it allows you to scan the QR code of your device, connect it to your WiFi network, and generate a unique AuthToken for it. The web console method is more manual, as it requires you to enter the AuthToken in your device’s firmware and upload it to your hardware.
To create a new device using the mobile app, you need to follow these steps:
- Tap Add new device in the Devices tab of the app.
- Make sure your device is powered on and waiting for connection.
- Tap Ready and choose your device from the list.
- Connect your device to your WiFi network and enter the password.
- Rename your device and choose a device template and a datastream.
- Review and confirm the device information and tap Apply.
To create a new device on Blynk using the console, you need to follow these steps:
- Install the latest version of Blynk library to the IDE you use.
- Define your Template ID and Device Name on top of your firmware, before any includes.
- Prepare your sketch with the logic and functionality of your device.
- Go to Devices >> Create New Device in the console and get your AuthToken.
- Update your sketch with the AuthToken and upload it to your device.
- Check if your device is online in the console or the app.
Widgets
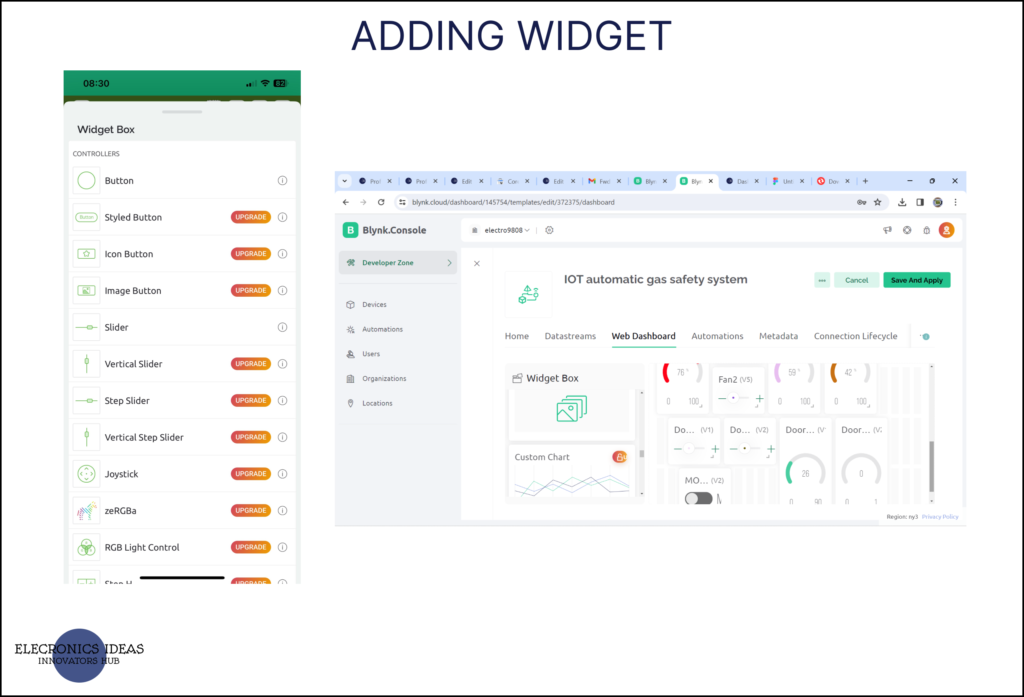
Adding widgets to devices on Blynk is a way to customize the app interface and interact with your hardware. Widgets are pre-designed pieces of graphic user interface that perform specific input/output functions. For example, you can use a button widget to send a command to your device, or a gauge widget to display a sensor value from your device.
There are four major types of widgets in Blynk:
- Controllers: UI elements used to send data to hardware. For example: buttons, switches, sliders, joysticks, etc.
- Displays: UI elements used to visualize the incoming data. For example: LEDs, charts, gauges, etc.
- Interface: Elements to build user-friendly UI. For example: tabs, drop-down menus, various inputs, etc.
- Other: Special widgets that don’t belong to any category. For example: terminal, video stream, map, etc.
To add widgets to devices on Blynk, you need to follow these steps:
- Tap on the wrench icon to open the device edit mode, then click on the “+” to open the Widget Box and select the widget as per your requirement. You can scroll the list and tap on the widget you need to add it to the grid.
- Tap on the widget to go to the settings. Here you can enter the name, select the datastream, choose the mode, color, font, and other options depending on the widget type.
- After setting up the widget, tap on the exit button ” x” on the top. You can also drag and resize the widget on the grid as you like.
- Repeat the steps for other widgets you want to add to your device. You can also edit or delete the widgets by tapping and holding on them. You can also rearrange the widgets by dragging them to different positions on the grid.
To wrap up, Blynk is a powerful and user-friendly platform that enables you to create IoT applications with a mobile app and the hardware of your choice. You can easily create device templates, datastreams, events, and web dashboards using Blynk.Console or Blynk.App. You can also add widgets to your devices to customize the app interface and interact with your hardware. Whether you are a hobbyist, a maker, or a professional, Blynk can help you turn your ideas into reality.
Related post
[wp_show_posts id=”3068″]



1 thought on “Understanding Blynk IOT”