You know the feeling: one wrong config command, and suddenly your media server, smart home hub, and file share are all down for hours. What began as a simple Raspberry Pi project has evolved into a complex mini data center with dozens of services, containers, and dependencies. Manual homelab automation becomes a time-consuming and error-prone chore that consumes your weekends.
The solution? Combine the battle-tested reliability of Ansible with the speed of AI-generated scripts to create a robust, automated, and even self-healing infrastructure. Modern generative AI bridges the gap between your intent and implementation, while Ansible’s mature configuration management ensures consistency across your entire home lab.
This guide assumes basic Linux command-line familiarity but no prior Ansible experience.
By the end of this guide, you’ll have:
- A 3-node automated infrastructure
- AI-generated playbooks for Docker, Nginx, and Portainer
- A self-healing service that auto-restarts on failure
- Transferable DevOps skills that are highly valued in the job market
If you’re still deciding on your homelab hardware foundation, check out our comparison of Energy-Efficient Homelab: ARM vs x86 vs Modern Mini PCs (2025 Guide).
Before You Start: What You’ll Need
Choose Your Setup Path
Path A: Single Machine (Easiest – Start Here)
- One Linux machine (your laptop, a VM, or single server)
- Perfect for learning and testing
- Uses
localhost– no networking complexity - Estimated setup time: 20 minutes
Path B: Multiple Nodes (Full Homelab)
- Control node (where you run Ansible) + 2-3 managed nodes
- Requires SSH key setup and network access
- More realistic for actual homelab automation
- Estimated setup time: 45 minutes
We’ll show both paths, starting with Path A for simplicity.
What You Actually Need
Required:
- Linux machine with terminal access (Ubuntu 20.04+, Debian 11+, or Rocky Linux 8+)
- Python 3.8 or newer (check with
python3 --version) - Internet connection for package downloads
- Text editor (nano, vim, or VS Code)
Helpful but Optional:
- Basic familiarity with YAML syntax
- Understanding of SSH (for multi-node setups)
- Git for version control
Common Misconceptions:
- You do NOT need powerful hardware (Raspberry Pi 4 works fine)
- You do NOT need to understand Python programming
- You do NOT need prior DevOps experience
Why Ansible and AI are a Perfect Match for Homelabs
Ansible’s Strengths: Agentless architecture, human-readable YAML, idempotent operations (safe to re-run), and massive community support make it ideal for homelab automation. Unlike competing tools, Ansible requires no agents on managed nodes, reducing complexity and overhead.
AI’s Role: Modern generative AI bridges the skills gap between intent (“install Nginx”) and implementation (writing correct Ansible modules and syntax). AI transforms natural language prompts into functional Infrastructure as Code, dramatically accelerating the learning process.
The Realistic Synergy:
Without AI assistance:
- Writing a 50-line PostgreSQL playbook: ~2 hours
- Researching correct modules and syntax: ~45 minutes
- Debugging initial errors: ~30 minutes
- Total: ~3+ hours for first attempt
With AI assistance:
- AI generates initial playbook: 2 minutes
- Human review and security audit: 15 minutes
- Testing with –check mode: 5 minutes
- Fixing AI mistakes and customizing: 20 minutes
- Total: ~40-50 minutes with better understanding
The real value isn’t just speed – it’s the learning accelerator. AI-generated code with comments teaches you Ansible patterns faster than reading documentation alone.
This builds on concepts from our previous exploration of Integrating AI Agents into Your Homelab: ChatGPT API and Local LLMs for 2025.
Getting Started: The Foundation (30 minutes setup)
Step 1: Find Your IP Addresses (Multi-Node Only)
If using single machine (localhost), skip to Step 2.
Before creating inventory files, identify your actual server IP addresses:
On each server you want to manage, run:
ip addr showLook for “inet” under your main network interface (usually eth0 or ens18). Example output:
inet 192.168.1.101/24 brd 192.168.1.255 scope global eth0Your IP is: 192.168.1.101
Alternative: Check your router’s DHCP client list or use:
hostname -IWrite these down! You’ll need them in 2 minutes.
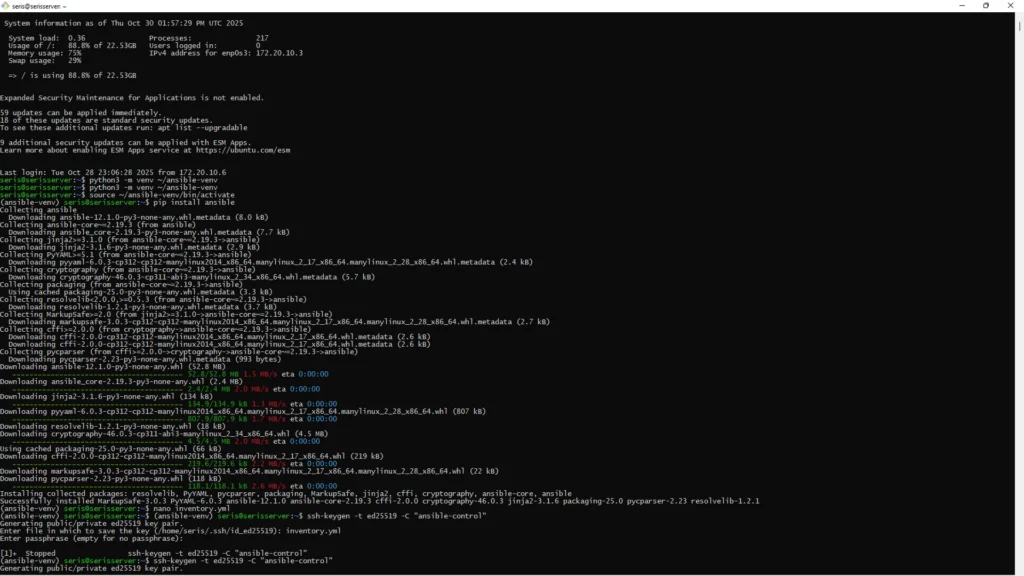
Step 2: Install Ansible
# Create and activate virtual environment (keeps things clean)
python3 -m venv ~/ansible-venv
source ~/ansible-venv/bin/activate

# Your prompt should now show (ansible-venv)

# Install Ansible
pip install ansible

# Install common collections
ansible-galaxy collection install community.docker community.general

# Verify installation
ansible --version
# Should show: ansible [core 2.15.x] or newer
Troubleshooting:
Error: “python3: command not found”
# Ubuntu/Debian:
sudo apt update && sudo apt install python3 python3-venv python3-pip

# Rocky Linux/CentOS:
sudo dnf install python3 python3-pip
Error: “pip: command not found”
sudo apt install python3-pip # Ubuntu/DebianError: “ansible: command not found”
# You're not in the virtual environment!
source ~/ansible-venv/bin/activate
# Your prompt should show (ansible-venv)
Step 3: Create Your Inventory File
For Single Machine (Localhost) Setup:
mkdir -p ~/ansible-homelab
cd ~/ansible-homelab
nano inventory.yml
Paste this exact content:
[homelab]
localhost

[homelab:vars]
ansible_connection=local
ansible_python_interpreter=/usr/bin/python3
That’s it! No SSH keys, no passwords, no networking. Save and close (Ctrl+X, Y, Enter).
For Multi-Node Setup:
mkdir -p ~/ansible-homelab
cd ~/ansible-homelab
nano inventory.yml
Paste and customize with YOUR actual values:
[homelab]
node1 ansible_host=192.168.1.101  # ← REPLACE with your actual IP
node2 ansible_host=192.168.1.102  # ← REPLACE with your actual IP
node3 ansible_host=192.168.1.103  # ← REPLACE with your actual IP

[homelab:vars]
ansible_user=youruser              # ← REPLACE with your actual SSH username
ansible_become=yes
ansible_python_interpreter=/usr/bin/python3
Step 4: SSH Key Setup (Multi-Node Only)
Skip this entirely if using localhost setup.
Generate SSH key on your control node:
ssh-keygen -t ed25519 -C "ansible-control"Prompts you’ll see:
Enter file in which to save the key: [Press ENTER - use default]
Enter passphrase (empty for no passphrase): [Press ENTER - no passphrase for homelab]
Enter same passphrase again: [Press ENTER]
Why no passphrase? For homelab automation, a passwordless key lets Ansible run without manual intervention. For production servers, use a passphrase.
Copy key to each managed node:
# Replace 'youruser' and IP with YOUR actual values
ssh-copy-id youruser@192.168.1.101
ssh-copy-id youruser@192.168.1.102
ssh-copy-id youruser@192.168.1.103
Expected output:
Number of key(s) added: 1

Now try logging into the machine with: "ssh 'youruser@192.168.1.101'"
Troubleshooting SSH:
Error: “Permission denied (publickey)”
- Check username is correct (
whoamion target server) - Ensure SSH is running:
sudo systemctl status ssh - Verify you can manually SSH:
ssh youruser@192.168.1.101
Error: “Connection refused”
- SSH daemon not running:
sudo systemctl start ssh - Firewall blocking port 22:
sudo ufw allow 22
Error: “Host key verification failed”
ssh-keygen -R 192.168.1.101  # Remove old host key
# Then retry ssh-copy-id
Step 5: Test Your Setup
For localhost:
ansible all -m ping -i inventory.ymlFor multi-node:
ansible all -m ping -i inventory.ymlSuccess looks like:
localhost | SUCCESS => {
    "changed": false,
    "ping": "pong"
}
Common errors:
- “Could not match supplied host pattern” → Check inventory.yml syntax
- “Failed to connect” → SSH key issue (multi-node) or wrong hostname
- “Permission denied” → Check ansible_user in inventory.yml
Quick Win: Your First 60-Second Victory
Let’s run something immediately to build confidence:
nano quickwin.ymlPaste this:
---
- name: Update all systems
  hosts: all
  become: yes
  tasks:
    - name: Update package cache and upgrade
      apt:
        update_cache: yes
        upgrade: dist
      when: ansible_os_family == "Debian"
Run it:
ansible-playbook -i inventory.yml quickwin.yml --ask-become-passNeed a virtualization platform? Compare Proxmox vs Unraid vs TrueNAS Scale: Best Virtualization Platforms 2025.
Your First AI-Assisted Playbook: A Walkthrough (45 minutes)
Step 1: Crafting the Perfect Prompt
Where to write your prompt:
- Any text editor: Just type your prompt somewhere you can copy it
- ChatGPT/Claude: Use their web interface or app
- Ansible Lightspeed: Use the VS Code extension
Create this exact prompt (copy and paste):
Create an Ansible playbook for Ubuntu 22.04 that:
- Installs Docker Engine and dependencies
- Adds the current user to the docker group
- Installs Docker Compose
- Deploys Portainer CE on port 9443
- Ensures all services start on boot
- Includes error handling and idempotent operations
- Uses community.docker collection where appropriate
Step 2: Reviewing the AI Output
The AI will generate YAML code. Create a new file called docker-portainer.yml:
nano docker-portainer.ymlPaste the AI-generated content (it will look similar to this):
---
- name: Install Docker and deploy Portainer
  hosts: localhost
  become: yes
  collections:
    - community.docker

  tasks:
    - name: Install required packages
      apt:
        name:
          - docker.io
          - docker-compose
          - python3-pip
        state: present
        update_cache: yes

    - name: Install Docker Python library
      pip:
        name:
          - docker
          - docker-compose
        state: present

    - name: Add user to docker group
      user:
        name: "{{ ansible_user }}"
        groups: docker
        append: yes

    - name: Start and enable Docker service
      systemd:
        name: docker
        state: started
        enabled: yes

    - name: Create Portainer volume
      docker_volume:
        name: portainer_data
        state: present

    - name: Deploy Portainer container
      docker_container:
        name: portainer
        image: portainer/portainer-ce:latest
        state: started
        restart_policy: unless-stopped
        ports:
          - "9443:9443"
          - "8000:8000"
        volumes:
          - /var/run/docker.sock:/var/run/docker.sock
          - portainer_data:/data

    - name: Wait for Portainer to be ready
      wait_for:
        port: 9443
        delay: 5
        timeout: 60

    - name: Display access information
      debug:
        msg:
          - "✅ Docker and Portainer installed successfully!"
          - "Access Portainer at: https://{{ ansible_default_ipv4.address }}:9443"
          - "Note: You may need to log out and back in for docker group changes to take effect"
AI can generate code with:
- Outdated module names
- Security vulnerabilities
- Hardcoded values that don’t match your setup
- Missing error handling
What to check:
Security Review:
- No hardcoded passwords or API keys
become: yesonly where necessary- Package sources are official (not random PPAs)
- Container images from trusted registries
Compatibility Review:
- Modules exist (AI sometimes invents them)
- Collection dependencies noted (e.g.,
community.docker) - OS-specific commands match your distribution
Logic Review:
- Tasks run in correct order
- Error handling present
- Idempotent (safe to run multiple times)
What If AI Gives You Different Code?
AI responses vary. Your generated playbook might:
- Use different module names (both can be correct)
- Include additional tasks (like firewall rules)
- Have different variable names
This is normal! As long as:
- Syntax check passes (
--syntax-check) - Dry run shows reasonable changes (
--check) - You’ve reviewed for security issues
You’re good to run it.
Run the Playbook
# Basic run
ansible-playbook install_docker-portainer.yml --ask-become-pass

# With verbose output
ansible-playbook install_docker-portainer.yml --ask-become-pass -vv
Step 3: Execution and Validation
# Test syntax first
ansible-playbook --syntax-check docker-portainer.yml

# Dry run to see what would change
ansible-playbook --check docker-portainer.yml -i inventory.yml

# Execute the playbook (with sudo password if needed)
ansible-playbook docker-portainer.yml -i inventory.yml --ask-become-pass
SECURITY CHECKPOINT: Before Running AI-Generated Code
- Always review playbooks running with
become: yesor sudo privileges - Use
--checkmode first:ansible-playbook --check playbook.yml - Test in isolated environment before production systems
- Never commit secrets to version control – use Ansible Vault
Step 4: Verify It Worked
Open your web browser and go to:
text
https://your-server-ip:9443You should see the Portainer setup screen! The AI just helped you deploy a complete container management system.
For more Docker container ideas, see 7 Essential Docker Containers for AI-Enhanced Homelabs (2025 Guide).
When Things Go Wrong: Debugging AI Playbooks
Common Errors and Solutions
Error: “MODULE NOT FOUND”
Full error:
ERROR! couldn't resolve module/action 'docker_container'Cause: Missing collection
Fix:
ansible-galaxy collection install community.docker

# Verify installation
ansible-galaxy collection list | grep community
Error: “Authentication or permission failure”
Full error:
fatal: [node1]: FAILED! => {"msg": "Failed to connect to the host via ssh: Permission denied (publickey,password)"}Causes & Fixes:
- SSH key not copied:
ssh-copy-id youruser@192.168.1.101- Wrong username in inventory:
# Check what username exists on target
ssh youruser@192.168.1.101 "whoami"

# Update inventory.yml with correct username- Target server SSH not running:
# On target server:
sudo systemctl start ssh
sudo systemctl enable ssh
Error: “BECOME password is required”
Full error:
fatal: [localhost]: FAILED! => {"msg": "Missing sudo password"}Cause: Playbook uses become: yes but you didn’t provide sudo password
Fix:
# Add --ask-become-pass flag
ansible-playbook playbook.yml -i inventory.yml --ask-become-pass
Error: “Package not found”
Full error:
fatal: [localhost]: FAILED! => {"msg": "No package matching 'docker.io' is available"}Cause: Wrong package name for your distribution
Fix – Better approach (detects OS automatically):
- name: Install Docker
  package:
    name: "{{ 'docker.io' if ansible_os_family == 'Debian' else 'docker-ce' }}"
    state: present
Essential Debug Commands
# 1. Check syntax (finds YAML errors)
ansible-playbook --syntax-check playbook.yml

# 2. Dry run (shows what would change)
ansible-playbook --check playbook.yml -i inventory.yml

# 3. Verbose output (see exactly what's happening)
ansible-playbook -vvv playbook.yml -i inventory.yml

# 4. Step through tasks interactively
ansible-playbook --step playbook.yml -i inventory.yml

# 5. Start at specific task (skip earlier tasks)
ansible-playbook --start-at-task "Install Docker" playbook.yml -i inventory.yml

# 6. Test without privileges (debugging)
ansible-playbook playbook.yml -i inventory.yml --become=no
Using AI to Debug Errors
When stuck, paste the error back to AI with context:
Example prompt:
I'm running this Ansible playbook on Ubuntu 22.04:

[paste your playbook]

I'm getting this error:

[paste full error message including traceback]

My inventory file uses localhost. What's wrong and how do I fix it?
AI is particularly good at spotting syntax errors, missing dependencies, and suggesting alternative approaches.
Validation Workflow
Always follow this sequence:
Syntax Check → Catches YAML formatting errors
Dry Run(`--check`) → Shows what would change
Execute → Actually makes the changes
Verify → Test that services work as expected
Building a Self-Healing Homelab with EDA (1 hour advanced setup)
Advanced Section – Complete the previous sections first. This requires comfort with Ansible playbooks and basic monitoring concepts.
Prerequisites for this section:
- Completed previous playbook sections
- Understanding of webhooks or monitoring tools
- Nginx or similar service installed to monitor
Not ready for EDA? Start with simpler cron-based health checks:
# Add to crontab -e
*/5 * * * * ansible-playbook /path/to/healthcheck.yml
Event-Driven Ansible (EDA) represents the evolution from reactive playbook execution to proactive, self-healing infrastructure – true AIOps in your homelab.
Install Event-Driven Ansible:
pip install ansible-rulebook ansible-runnerCreate Rulebook and Playbooks:
Create rulebooks/nginx-monitor.yml:
---
- name: Monitor and heal Nginx service
  hosts: all
  sources:
    - ansible.eda.webhook:
        host: 0.0.0.0
        port: 8080

  rules:
    - name: Remediate high HTTP response time
      condition: event.payload.alert.rule.expression is match("responseTime > 500", ignorecase=true)
      action:
        run_playbook:
          name: playbooks/restart-nginx.yml

    - name: Remediate Nginx service down
      condition: event.payload.service == "nginx" and event.payload.status == "down"
      action:
        run_playbook:
          name: playbooks/restart-nginx.yml

    - name: Remediate high error rate
      condition: event.payload.error_rate > 10
      action:
        run_playbook:
          name: playbooks/restart-nginx.yml
Create remediation playbook playbooks/restart-nginx.yml:
---
- name: Restart Nginx and notify
  hosts: all
  become: yes
  tasks:
    - name: Restart Nginx service
      systemd:
        name: nginx
        state: restarted

    - name: Wait for Nginx to be responsive
      wait_for:
        port: 80
        delay: 5
        timeout: 30
Run the rulebook:
ansible-rulebook -i inventory.yml --rulebook rulebooks/nginx-monitor.ymlThis takes automation to the next level from our earlier exploration of How I Automated Fixes in My Homelab with ChatGPT.
Practical Homelab Automation Use Cases
Based on real-world homelab scenarios, here are essential automation tasks you can implement:
Docker Cleanup Automation:
---
- name: Clean up Docker system
  hosts: homelab
  become: yes  # Docker usually needs sudo
  tasks:
    - name: Prune unused Docker images
      community.docker.docker_prune:
        images: yes
        images_filters:
          dangling: yes
      register: prune_result

    - name: Display cleanup results
      debug:
        msg: "Freed up space: {{ prune_result.images_space_reclaimed | default('Unknown') }}"
Automated Backups:
---
- name: Backup critical configurations
  hosts: homelab
  become: yes
  vars:
    backup_timestamp: "{{ ansible_date_time.epoch }}"
    source_dir: /opt/docker
    backup_dir: /backups/docker

  tasks:
    - name: Ensure backup directory exists
      file:
        path: "{{ backup_dir }}"
        state: directory
        mode: '0755'

    - name: Check if source directory exists
      stat:
        path: "{{ source_dir }}"
      register: source_check

    - name: Backup Docker Compose files
      shell: |
        if [ -f "{{ source_dir }}/{{ item }}" ]; then
          cp -p "{{ source_dir }}/{{ item }}" "{{ backup_dir }}/{{ item }}-{{ backup_timestamp }}"
          echo "Backed up {{ item }}"
        else
          echo "File {{ item }} not found, skipping"
        fi
      loop:
        - docker-compose.yml
        - .env
      register: backup_result
      when: source_check.stat.exists

    - name: Display backup results
      debug:
        msg: "{{ backup_result.results | map(attribute='stdout') | list }}"
SSL Certificate Monitoring:
---
- name: Restart Nginx and notify
  hosts: all
  become: yes
  vars:
    nginx_http_port: 80
    nginx_https_port: 443
    health_check_url: "http://localhost"

  tasks:
    - name: Check if Nginx is installed
      stat:
        path: /usr/sbin/nginx
      register: nginx_binary

    - name: Fail if Nginx is not installed
      fail:
        msg: "Nginx is not installed on {{ inventory_hostname }}"
      when: not nginx_binary.stat.exists

    - name: Test Nginx configuration syntax
      command: nginx -t
      register: config_test
      changed_when: false
      failed_when: config_test.rc != 0

    - name: Display config test results
      debug:
        msg: "{{ config_test.stderr_lines }}"

    - name: Get Nginx status before restart
      systemd:
        name: nginx
      register: nginx_before

    - name: Restart Nginx service
      systemd:
        name: nginx
        state: restarted
        enabled: yes
      register: restart_result

    - name: Wait for Nginx to be responsive on HTTP
      wait_for:
        port: "{{ nginx_http_port }}"
        delay: 3
        timeout: 30
        host: "{{ ansible_default_ipv4.address | default('127.0.0.1') }}"
        state: started
      register: http_check

    - name: Wait for Nginx to be responsive on HTTPS
      wait_for:
        port: "{{ nginx_https_port }}"
        delay: 2
        timeout: 30
        host: "{{ ansible_default_ipv4.address | default('127.0.0.1') }}"
        state: started
      register: https_check
      ignore_errors: yes

    - name: Perform HTTP health check
      uri:
        url: "{{ health_check_url }}"
        status_code:
          - 200
          - 301
          - 302
        timeout: 10
      register: health_check
      ignore_errors: yes

    - name: Get Nginx process info
      shell: ps aux | grep -E '[n]ginx' | wc -l
      register: nginx_processes
      changed_when: false

    - name: Generate restart report
      set_fact:
        restart_report:
          hostname: "{{ inventory_hostname }}"
          timestamp: "{{ ansible_date_time.iso8601 }}"
          status: "{{ 'SUCCESS' if restart_result.changed else 'NO_CHANGE' }}"
          http_port_open: "{{ http_check.state | default('unknown') }}"
          https_port_open: "{{ 'yes' if https_check.state is defined and https_check.state == 'started' else 'no/not_configured' }}"
          health_check: "{{ health_check.status | default('failed') }}"
          nginx_processes: "{{ nginx_processes.stdout }}"

    - name: Display restart report
      debug:
        var: restart_report

    - name: Send success notification
      debug:
        msg:
          - "🎉 NGINX RESTART SUCCESSFUL"
          - "Host: {{ inventory_hostname }}"
          - "Time: {{ ansible_date_time.iso8601 }}"
          - "HTTP Status: ✅"
          - "HTTPS Status: {{ '✅' if https_check.state is defined and https_check.state == 'started' else '⚠️ Not configured' }}"
          - "Worker Processes: {{ nginx_processes.stdout }}"
      when: restart_result.changed

  handlers:
    - name: Log restart to syslog
      shell: logger "Nginx restarted via Ansible on {{ inventory_hostname }}"
      listen: "nginx restarted"
Container Auto-Update Script:
#!/bin/bash
# Simple container update script
docker-compose pull
docker-compose up -d
docker image prune -f
Exploring the AI Toolbox for Ansible
Current AI Tool Landscape for Ansible:
Ansible Lightspeed with IBM watsonx Code Assistant:
- UPDATED: Now generally available (GA) in Ansible Automation Platform 2.6
- Integrated directly into the platform UI to help administrators install, configure, and maintain automation environments
- Coming Q4 2025: Flexible connectivity to third-party model providers (Azure OpenAI, OpenAI, IBM watsonx.ai)
- Coming Q4 2025: On-premise deployment options for enhanced security and compliance
Popular General AI Coding Assistants:
| Tool | Plan | Monthly Cost | Key Strength |
|---|---|---|---|
| ChatGPT | Plus / Team | ~€23 / ~€29 | Best-in-class reasoning; strong plugin ecosystem |
| Claude | Pro | $20 | Excellent long-context retention and detailed code reviews |
| GitHub Copilot | Pro / Business | $10 / $19 | Tight integration with Microsoft’s developer ecosystem |
| Cursor | Pro | $20 | AI-first editor designed for rapid iteration |
Practical AI Usage Patterns:
- Playbook Generation: From natural language descriptions
- Code Explanation: Understanding complex existing playbooks
- Error Debugging: Pasting error messages for analysis
- Best Practices: Learning Ansible conventions and patterns
Advanced Safety & Governance
The Golden Rules of AI-Generated Automation:
- Never Blindly Trust AI Code – always conduct human review
- Use –check Mode First on all initial playbook runs
- Version Control Everything with Git for audit trails and rollback
- Test in Isolation using VM snapshots or dedicated test environments
- Start Small, Scale Smart – begin with single tasks before complex workflows
- Implement Rollback Strategies for all destructive operations
- Use Ansible Vault for secrets management
Critical Security Practices:
- Review all playbooks using
become: yes - Validate external repository URLs and container images
- Use least privilege principles for service accounts
- Regular security updates and vulnerability scanning
Common Pitfalls to Avoid:
- Running unvetted AI-generated playbooks on production systems
- Skipping dry-run (
--check) validation steps - Hardcoding sensitive values instead of using variables
- Ignoring Ansible linting and syntax warnings
- Making manual changes that cause configuration drift
Conclusion: Your Homelab, Transformed
You started with manual configuration headaches and weekend troubleshooting marathons. Now you command an intelligent, self-healing infrastructure that works while you sleep.
What You’ve Accomplished:
- From fragile to resilient: Manual configs are replaced with version-controlled, repeatable automation
- From reactive to proactive: Instead of fixing broken services, you’re building systems that heal themselves
- From hobbyist to professional: These are the same DevOps patterns used in enterprise environments
- From time-sink to innovation platform: Your weekends are now for building, not fixing
Beyond the Homelab:
The skills you’ve mastered Infrastructure as Code, configuration management, AI-assisted development, are exactly what organizations value in today’s DevOps landscape. Your homelab is no longer just a collection of services; it’s your personal sandbox for developing career-ready expertise.
Your Automation Foundation:
You now have a framework that scales. The same patterns that manage your three nodes can orchestrate thirty or three hundred. Whether you’re expanding to Kubernetes, exploring cloud infrastructure, or building complex multi-service applications, your Ansible+AI foundation adapts with you.
What’s Next?
Consider this just the beginning. Your automated homelab is now ready for:
- AI agent workflows that predict and prevent issues before they occur
- Multi-cloud deployments with consistent configuration management
- Complex service meshes with automated health monitoring
- CI/CD pipelines that test and deploy your infrastructure changes
You haven’t just automated your homelab you’ve built a platform for continuous learning and innovation. The same systems that run your media server today could be managing enterprise infrastructure tomorrow.


