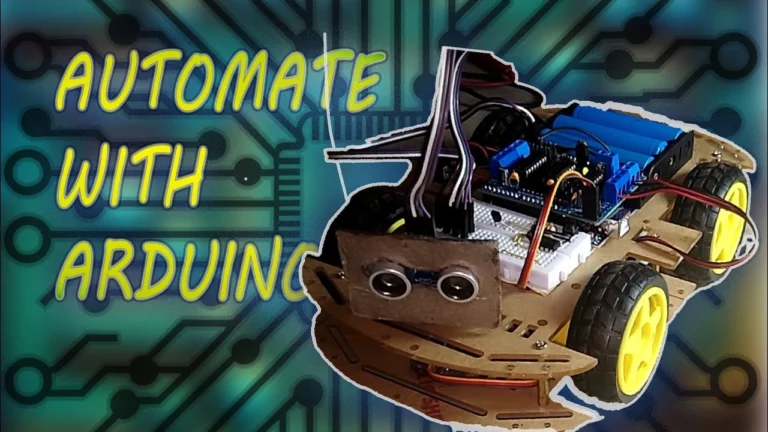
Creating a self-driving obstacle avoidance robot is an exciting venture, and with this obstacle-avoidance robot, you’ll learn how to navigate an Arduino-based project to avoid obstacles autonomously. Using sensors, motors, and some clever programming, this robot will detect obstacles and adjust its path accordingly—essentially a self-driving car!
Hardware Components Used in This Project
Here are the main components used to build the obstacle avoidance robot:
| S/NO | Components | Specification | QTY |
| 1 | Arduino | uno | 1 |
| 2 | Ultrasonic sensor | HC-SR04 | 1 |
| 3 | Servo Motor | SG90 | 1 |
| 4 | DC Motor | – | 2-4 |
| 5 | Motor Driver | L293D | 1 |
| 6 | Wheels and Chassis | – | 1 |
| 7 | Batteries | 3.7v lithium | 3 |
| 8 | Push buttons | – | 2 |
| 9 | Breadboard | – | 1 |
| 10 | NPN Transistor | BC547 | 1 |
| 11 | Timer IC | NE555 | 1 |
| 12 | Resistors | 1KΩ and 10KΩ | – |
| 13 | Jumper Wires | As needed |
Circuit diagram for the Autonomous Obstacle Avoidance Robot
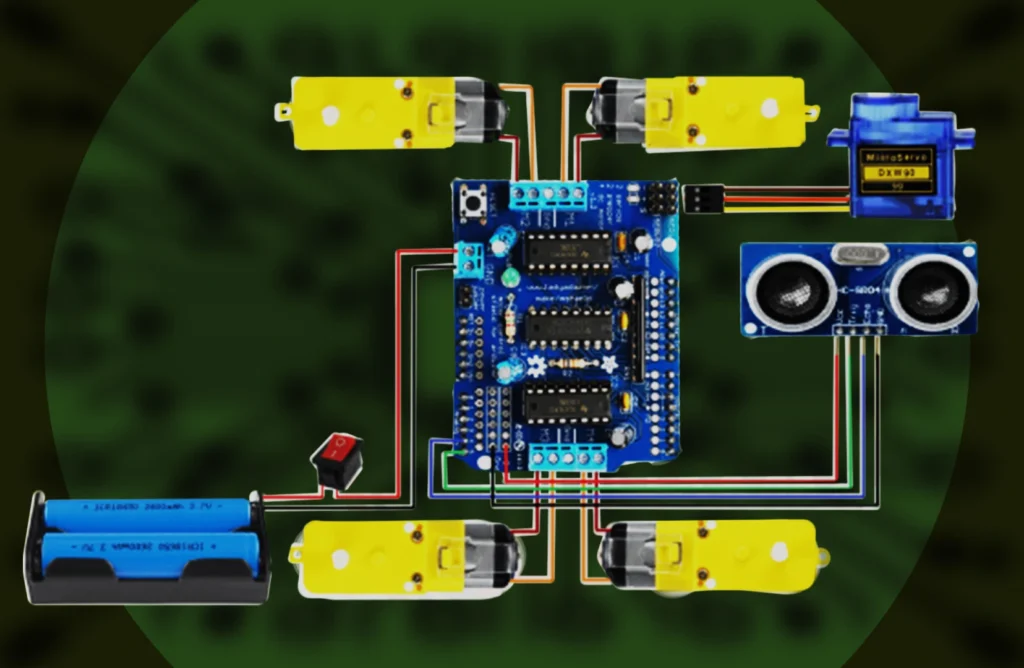
Code for Obstacle Avoidance Robot
#include "AFMotor.h"
#include <Servo.h>

#define echopin A4 // Echo pin
#define trigpin A5 // Trigger pin

Servo myservo;

const int MOTOR_1 = 1;
const int MOTOR_2 = 2;
const int MOTOR_3 = 3;
const int MOTOR_4 = 4;

AF_DCMotor motor1(MOTOR_1, MOTOR12_64KHZ); // create motor object, 64KHz pwm
AF_DCMotor motor2(MOTOR_2, MOTOR12_64KHZ); // create motor object, 64KHz pwm
AF_DCMotor motor3(MOTOR_3, MOTOR12_64KHZ); // create motor object, 64KHz pwm
AF_DCMotor motor4(MOTOR_4, MOTOR12_64KHZ); // create motor object, 64KHz pwm

//===============================================================================
//  Initialization
//===============================================================================

int distances[8];  // Array to store distances at each angle
long distance;
const int stopDistance = 30; // Stop distance in cm
int motorSpeed = 180; // Initial motor speed
int servoAngles[] = {0, 30, 60, 90, 120, 150, 180};  // Angles for scanning, including 0° and 180°

void setup() {
  Serial.begin(9600);           // Initialize serial port
  Serial.println("Start");

  myservo.attach(10);
  myservo.write(90); // Servo facing forward

  pinMode(trigpin, OUTPUT);
  pinMode(echopin, INPUT);

  // Set the motor speed to 30% higher
  motorSpeed = motorSpeed * 1.3; // Increase motor speed by 30%
  motor1.setSpeed(motorSpeed);
  motor2.setSpeed(motorSpeed);
  motor3.setSpeed(motorSpeed);
  motor4.setSpeed(motorSpeed);
}

//===============================================================================
//  Main
//===============================================================================
void loop() {
  // Measure the distance in front of the car
  long distance_F = getAverageDistance();

  // Print the distance
  Serial.print("Front Distance = ");
  Serial.println(distance_F);

  // If distance in front is greater than the stop threshold, move forward
  if (distance_F > stopDistance) {
    Serial.println("Moving Forward");
    moveForward();
  } else {
    // If object is detected within stop distance, stop the car and scan for available paths
    Serial.println("Object Detected - Stopping");
    stopCar();
    scanForClearPath();
  }

  delay(100); // Short delay for smooth operation
}

//===============================================================================
//  Distance Measurement Function (with Averaging)
//===============================================================================
long getDistance() {
  digitalWrite(trigpin, LOW);
  delayMicroseconds(2);
  digitalWrite(trigpin, HIGH);
  delayMicroseconds(10);
  digitalWrite(trigpin, LOW);

  long duration = pulseIn(echopin, HIGH);
  long distance = duration / 29 / 2;  // Convert time to distance in cm
  return distance;
}

// Function to get average distance for better accuracy
long getAverageDistance() {
  long totalDistance = 0;
  const int numReadings = 3; // Number of readings to average

  for (int i = 0; i < numReadings; i++) {
    totalDistance += getDistance();
    delay(10); // Small delay between readings
  }

  return totalDistance / numReadings;
}

//===============================================================================
//  Motor Control Functions
//===============================================================================
void moveForward() {
  motor1.run(FORWARD);
  motor2.run(FORWARD);
  motor3.run(FORWARD);
  motor4.run(FORWARD);
}

void stopCar() {
  motor1.run(RELEASE);         // Stop motors
  motor2.run(RELEASE);
  motor3.run(RELEASE);
  motor4.run(RELEASE);
}

//===============================================================================
//  Servo Scanning for Clear Path (Scanning Diagonally and at Extremes)
//===============================================================================
void scanForClearPath() {
  // Loop through each servo angle for scanning
  for (int i = 0; i < 7; i++) {
    myservo.write(servoAngles[i]); // Set servo to angle
    delay(120); // Delay to allow servo to move and stabilize
    distances[i] = getAverageDistance(); // Store the measured distance
    Serial.print("Distance at ");
    Serial.print(servoAngles[i]);
    Serial.print("° = ");
    Serial.println(distances[i]);
  }

  // Return servo to center (90°)
  myservo.write(90);
  delay(120);

  // Determine the direction with the longest clear distance
  int maxDistanceIndex = 0;
  for (int i = 1; i < 7; i++) {
    if (distances[i] > distances[maxDistanceIndex]) {
      maxDistanceIndex = i;
    }
  }

  int maxDistance = distances[maxDistanceIndex];
  int chosenAngle = servoAngles[maxDistanceIndex];

  // Decide direction based on the longest clear distance
  if (maxDistance > stopDistance) {
    if (chosenAngle == 90) {
      Serial.println("Clear path ahead, moving forward");
      moveForward();
    } else if (chosenAngle < 90) {
      Serial.println("Clear diagonal path to the right, turning right");
      turnRight(chosenAngle);
    } else {
      Serial.println("Clear diagonal path to the left, turning left");
      turnLeft(chosenAngle);
    }
  } else {
    Serial.println("No clear path, moving backward to rescan.");
    moveBackward(); // Move backward if no clear path found
    stopCar();
    scanForClearPath(); // Rescan environment
  }
}

//===============================================================================
//  Turning Functions with Diagonal Angle
//===============================================================================
void turnRight(int angle) {
  // Adjust turn based on angle
  int turnTime = map(angle, 0, 90, 100, 400); // Adjust turn time based on angle (faster for smaller angles)
  motor1.run(FORWARD);
  motor2.run(FORWARD);
  motor3.run(BACKWARD);
  motor4.run(BACKWARD);
  delay(turnTime); // Adjust turning time
  moveForward(); // Continue moving forward after turning
}

void turnLeft(int angle) {
  // Adjust turn based on angle
  int turnTime = map(angle, 90, 180, 400, 600); // Adjust turn time based on angle
  motor1.run(BACKWARD);
  motor2.run(BACKWARD);
  motor3.run(FORWARD);
  motor4.run(FORWARD);
  delay(turnTime); // Adjust turning time
  moveForward(); // Continue moving forward after turning
}

//===============================================================================
//  New Function: Move Backward
//===============================================================================
void moveBackward() {
  motor1.run(BACKWARD);
  motor2.run(BACKWARD);
  motor3.run(BACKWARD);
  motor4.run(BACKWARD);
  delay(1000); // Move backward for 1 second
}
How the Obstacle-Avoidance Robot Works
This robot uses an ultrasonic sensor to detect obstacles and adjust its path to avoid them. Here’s a breakdown of its functioning:
- component assembly and Circuit connections:
- The Arduino controls the entire system, sending commands to the motor driver (L293D) to drive the DC motors.
- The NE555 timer operates in a bistable mode, managed by push buttons to control the PWR pins.
- A BC547 NPN transistor is used to switch the circuit and bridge the PWR pins of the motor shield. A resistor is included in the NE555 timer circuit to stabilize its output.
- The ultrasonic sensor (HC-SR04) detects obstacles by measuring the time it takes for sound waves to bounce back from objects. If an obstacle is detected within a set range(30 cm in this case), the Arduino sends signals to adjust the robot’s path.
2. Programming the Robots Movement:
- The ultrasonic sensor scans in intervals of 0°, 30°, 60°, 90°, 120°, 150° and 180°.
- Based on sensor readings, the Arduino calculates the safest path and adjusts motor speed and direction accordingly.
- The servo motor rotates the ultrasonic sensor, allowing the robot to scan its surroundings.
3. Enhancing Obstacle Avoidance:
- If obstacles are detected on all sides, the robot will reverse and rescan for a new path.
- Fine-tuning the motor speeds and sensor accuracy ensures smoother and more precise obstacle avoidance.
4. Testing and Optimization:
- Test the robot in different environments, refining the code and position of the sensor, sometimes the obstacle may not be high enough to be sensed by the sensor.
Applications and Uses of Obstacle Avoidance Robot
The obstacle-avoidance robot is ideal for robotics beginners and enthusiasts interested in creating autonomous vehicles. This project has applications in:
- Robotics education and workshops
- Autonomous vehicle research and development
- Indoor navigation systems
Additional Resources and Connect with Me
- Code & Documentation: Check out the project’s full code, circuit diagrams, and documentation on my GitHub.
- Project Files: Download all project files, schematics, and additional resources from my Google Drive.
- Professional Networking: Connect with me on LinkedIn for updates on new projects and tutorials.
- Stay Updated: For more hands-on electronics projects and tutorials, follow me on YouTube and X.
